I recently finished my latest uArm project, and this time it’s a rather abstract idea.
I decided that I wanted to make a project that showcases uArm Creator Studio, computer vision, and the uArm- but it also had to be artistic in some way/shape/form.
With that in mind, I remembered a cool effect that lasers had on glow-in-the-dark paint, something that I had used in a previous project. I decided that uArm just had to be a part of this. The only thing that was left was how to make it interactive.
I disliked the idea of having the uArm draw out a premade image, because I wanted people to have fun with it. I came up with the idea of having different markers with numbers on them, and the camera would recognize these numbers and the uArm would follow these points, like “connect the dots”.
Here’s a quick tutorial on how to make your own Glow-Bot Laser Artist.
###Materials:
-
Lots of Glow-in-the-dark paint. -
Some sheet to put the glow-in-the-dark paint on. -
A uArm. -
A dark area. -
A 403 nm Violet Laser (5 mw is good, but higher is better. Be careful with your eyes!) -
A camera (and a mount for that camera). Any 640x480p camera will work. 24 fps is good, and try to get one without auto-focus. -
A computer with uArm Creator Studio -
Circular markers
###Tutorial
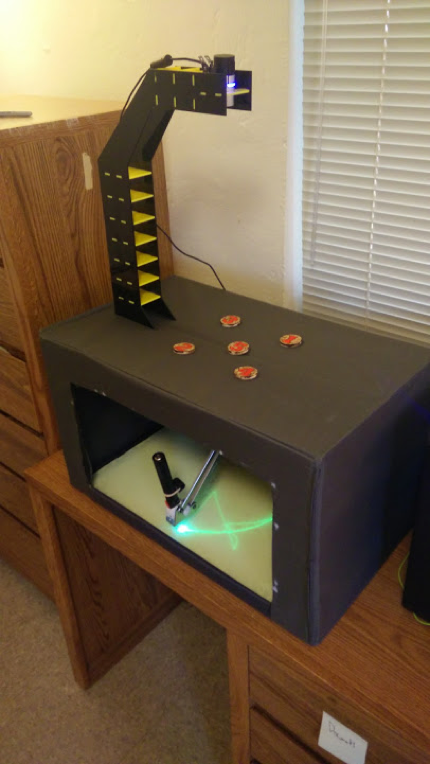
- First, you need to make the glow-in-the-dark board.
- This is a simple step. Just use your glow in the dark paint and put it on some surface. I laser-cut three layers of acrylic, and empties the 2nd layer and filled it completely with glow in the dark paint. I placed aluminum foil at the end of the third layer, so that the laser light would reflect back through the glow in the dark and double-charge it.
- You need to make the markers that the camera will recognise.
- I laser-cut 10 markers numbered 0-9, and I placed a ton of detail on them so that it will be easier to recognize. I also bought neon-orange paint and put it on the numbers, so that it would look cool and be more visible from afar.
- You need a dark area so that the laser drawings are very visible.
- I bought a laundry hamper and cut it up using a dremel, but any dark room will do. The reason I did this was because the Maker Faire would have bright lights all around, and I needed darkness.
- You need a camera mount for the vision.
- I designed my own camera mount and laser cut it, then glued the pieces together. An easier way to do this would be to get a desk lamp that extends and can be moved around, take out the bulb, then put the camera in it. That leaves you with a very modular mobile camera mount.
-
Assembly: You need to mount your robot so that it’s immobile, and put your camera mount over the robot so that it, too, is immobile. Put the glow-board in front of the robot.
-
Now, it’s time to set up the software.
- First, make sure you have uArm Creator Studio (UCS) installed and working on your computer.
- Go to Resources->New Vision Object, and make a vision object for each marker (0 through 9)Make sure the lighting is good.
- Next, calibrate your robot. After this step you should never move your robot or camera, if you do you will need to recalibrate.
- The programming for this project can be done easily, if you want to have no special features. I had many extra features in my project, so I won’t be giving that explanation in my tutorial.
- The simple flow for the programming is this:
- Make a Step event, then add a “Move Relative To Object” command from the Vision tab.
- Select the “0” marker object that you created in the last step.
- Set x to 0, y to 0, and keep z blank. That’s important!
- Drag in 9 more commands and do this process for each command.
The reason this works so well is because if the software doesn’t see 0, it will move to the next command. If it doesn’t see 1, it will go to 2. If it see 2, it will move to 2. If it sees 3, it will do the same. The final effect is the robot tracing out the numbers, in order!
Good luck!!